

PM AI Bridge
PM AI Bridge lets your own AI app, installed on the same computer as ProcessModel, work with ProcessModel for you. Your AI can read your model, change it, run it and read the results, and you can take control back at any time.
What PM AI Bridge is, and who has it
Section titled “What PM AI Bridge is, and who has it”PM AI Bridge is a switch in Settings, on a card that reads “Let your own AI on this computer control ProcessModel.” While it is on, an AI app on the same computer can work with the model you have open. Your AI works through ProcessModel itself, so what it gets back is what ProcessModel answers.
The AI is your own. You use the AI app you already have, with your own account, and ProcessModel does not provide one.
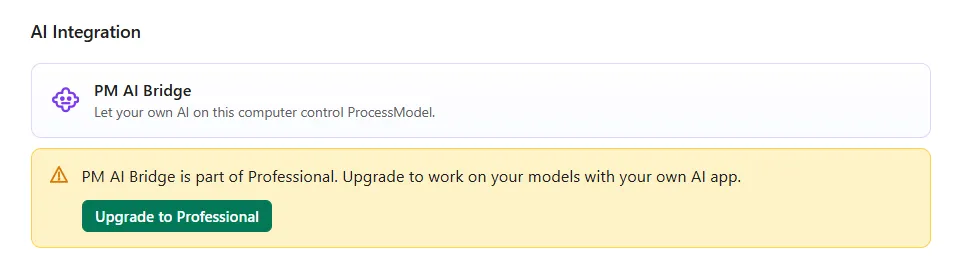
PM AI Bridge is part of Professional. On the Personal license it is off: Settings shows no switch for it, and says “PM AI Bridge is part of Professional. Upgrade to work on your models with your own AI app.” beside an Upgrade to Professional button.
Besides a license above Personal, you need an AI app installed on the same computer, with your own account for it. An AI you only use in a web browser cannot reach ProcessModel. For the limits of the Personal license, see Free Trial and Personal Mode.
Turn it on
Section titled “Turn it on”- On the Welcome screen, open Settings.
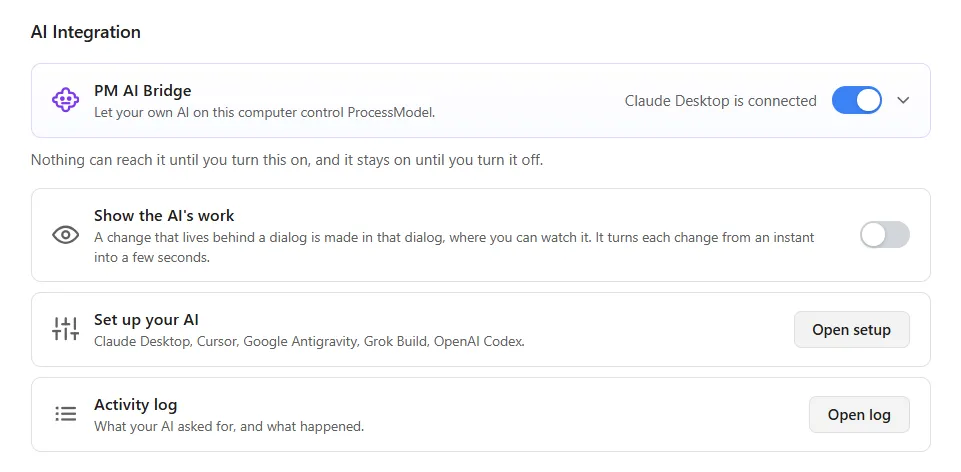
- Find AI Integration. It holds one card, PM AI Bridge, with a switch and an arrow at its right.
- Turn the switch on.
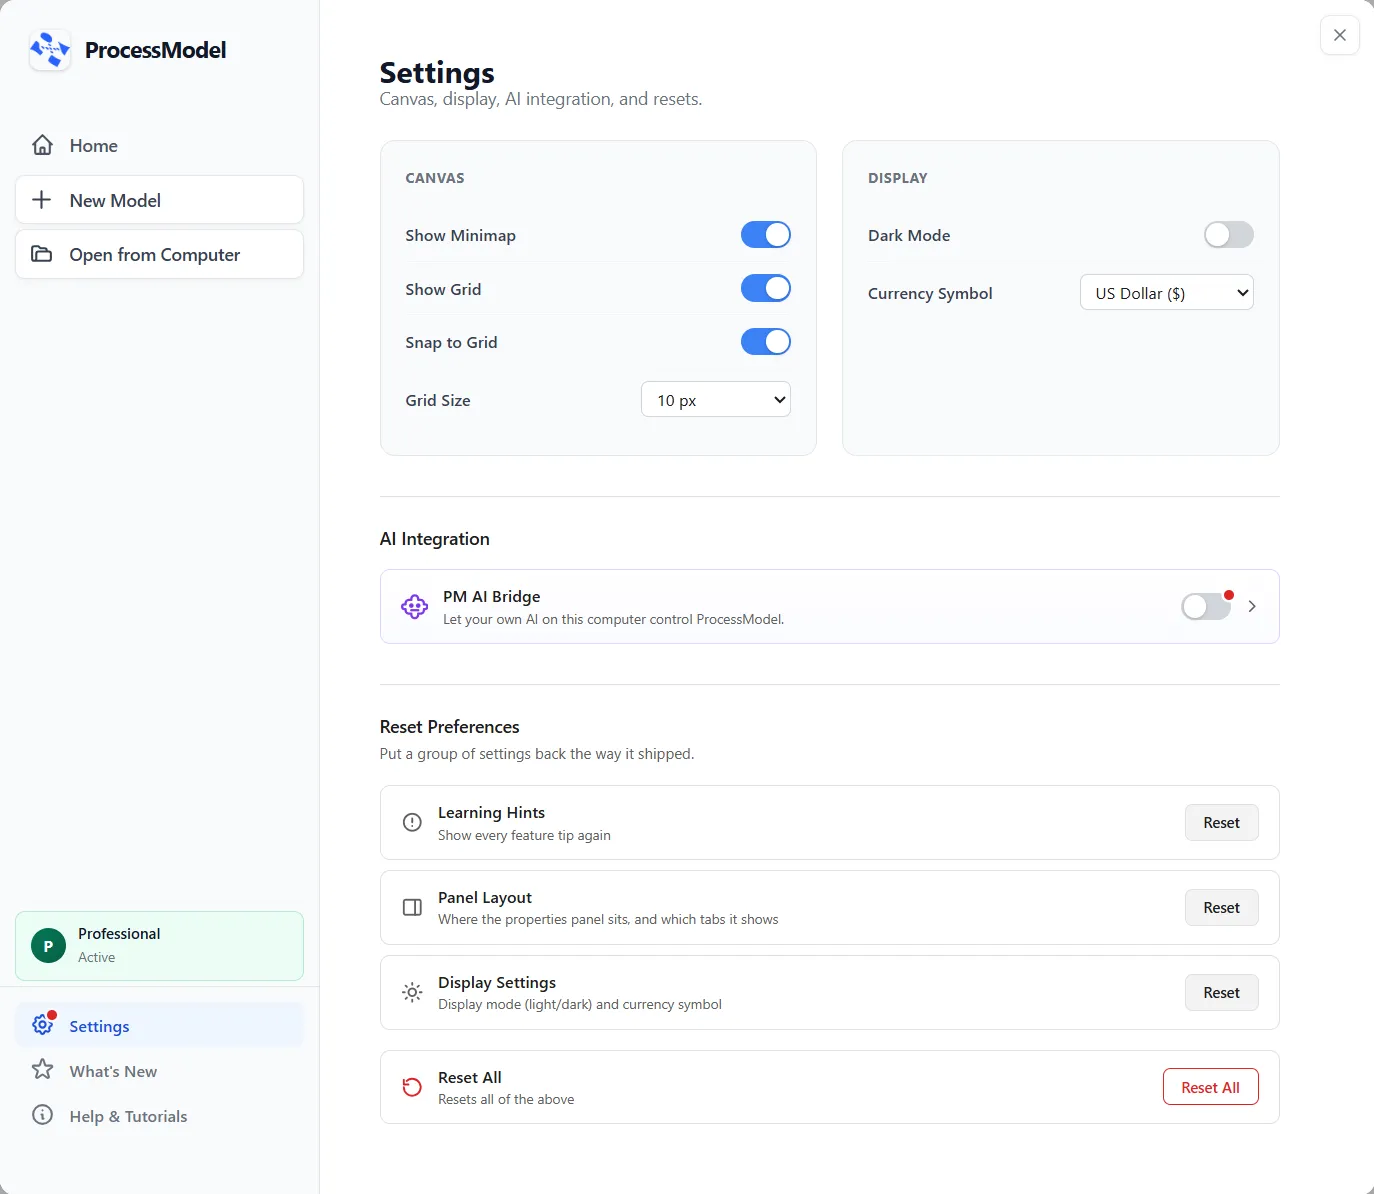
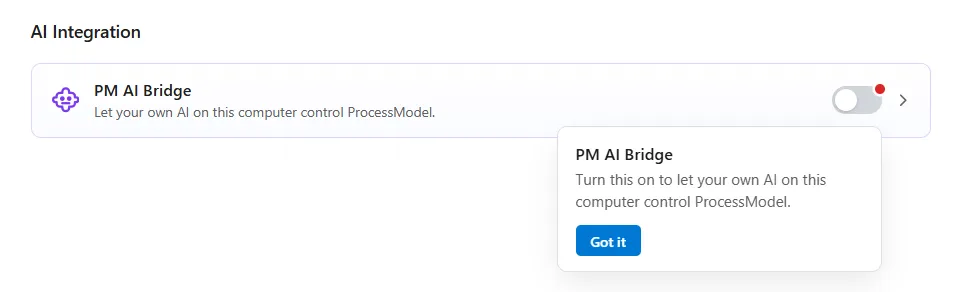
A red dot may sit on the switch. It is a Learning Hint: rest the pointer on the switch for a moment and a note says what the switch does, with a Got it button. The dot goes away the first time you use the switch, or when you choose Got it. The same dot marks Settings in the Welcome screen’s left list, and goes with it. To see it again, choose Reset beside Learning Hints under Reset Preferences.

Turning the switch on does not turn PM AI Bridge on by itself. A window opens first, “Before you turn on PM AI Bridge”. It says that PM AI Bridge “lets an AI app on this computer read and change your models, run them and read their results,” and makes three points:
- What your AI reads is sent to its provider. Your models, settings and results go to the company that provides your AI. That company handles them under its own terms and privacy policy.
- How your data is used depends on your plan. Some plans keep what you send, or use it to improve their AI. Check the data settings of your plan, and your organization’s rules, before you work with confidential models.
- Your AI subscription is your own. You choose the AI app and you pay its provider. ProcessModel does not provide it, bill for it or control it.
It ends with “You are responsible for the AI you use and for how it handles your data.”
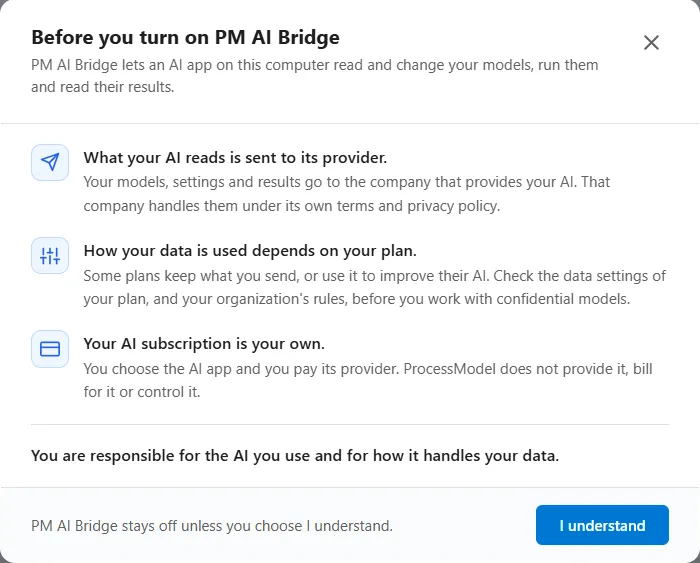
The foot of the window reads “PM AI Bridge stays off unless you choose I understand.” The X and Esc leave it off. I understand turns PM AI Bridge on, opens the card and opens the Set up window, described next. If ProcessModel cannot turn it on, it says “PM AI Bridge could not be turned on.” This window opens each time you turn the switch on. Turning the switch off asks nothing.
Click the card to open it. It says “Nothing can reach it until you turn this on, and it stays on until you turn it off.” and holds three rows:
- Show the AI’s work, a switch, described under While your AI works.
- Set up your AI, with the button Open setup. The button is gray while PM AI Bridge is off.
- Activity log, with the button Open log.
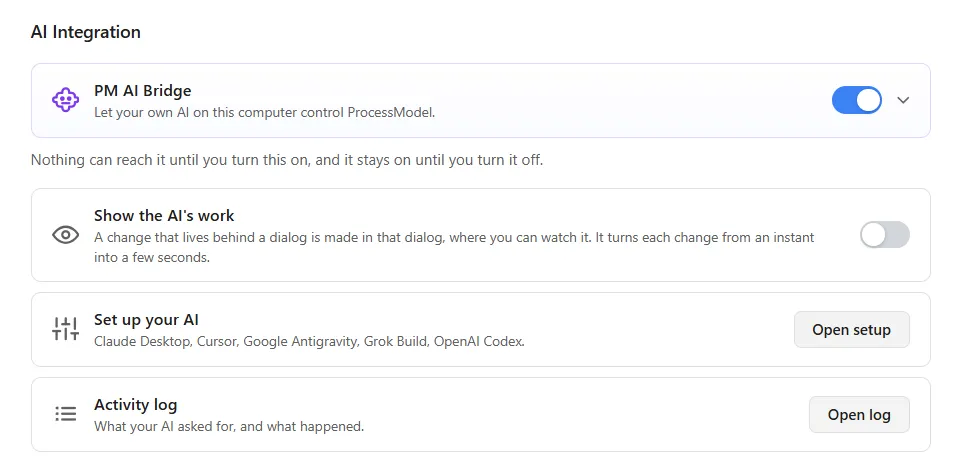
Turn the switch off whenever you like. Nothing can reach ProcessModel until you turn it on again. Your AI keeps the setup it made, so turning PM AI Bridge back on does not mean setting your AI up again. The Set up window opens each time; if your AI is already set up, choose Done.
Set up your AI
Section titled “Set up your AI”The Set up window opens by itself after I understand. Open it again at any time with Open setup in Settings. It is titled “Set up PM AI Bridge” and reads “A one time setup on this computer. Your AI does the work.” It has four steps.
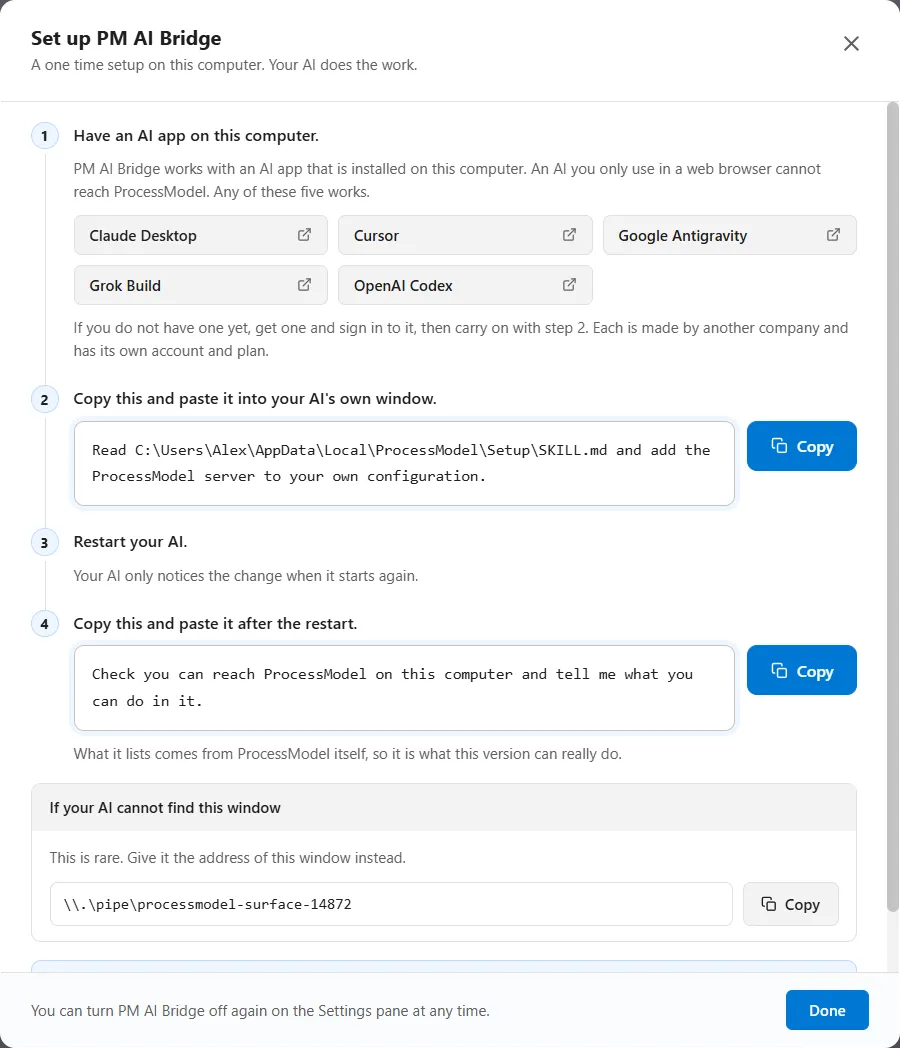
- Have an AI app on this computer. The window says “PM AI Bridge works with an AI app that is installed on this computer. An AI you only use in a web browser cannot reach ProcessModel. Any of these five works.” It has one button for each: Claude Desktop, Cursor, Google Antigravity, Grok Build and OpenAI Codex. A button opens that app’s page in your browser. If you do not have one yet, get one and sign in to it, then carry on with step 2. Each is made by another company and has its own account and plan.
- Copy this and paste it into your AI’s own window. Choose Copy, then paste the line into your AI app’s own window and send it. The line begins “Read”, names a file on your computer that ProcessModel installed, and asks your AI to add ProcessModel to its own configuration. Your AI makes that change itself.
- Restart your AI. “Your AI only notices the change when it starts again.”
- Copy this and paste it after the restart. Once your AI is running again, paste the second line into its window. It reads “Check you can reach ProcessModel on this computer and tell me what you can do in it.” The window adds “What it lists comes from ProcessModel itself, so it is what this version can really do.”
Each Copy button changes to Copied once the line is on your clipboard.
If your AI cannot find this window
Section titled “If your AI cannot find this window”At the foot of the window, a box with that title says “This is rare. Give it the address of this window instead.” It shows the address with its own Copy button. If your AI cannot find ProcessModel on its own, paste the address into its window.
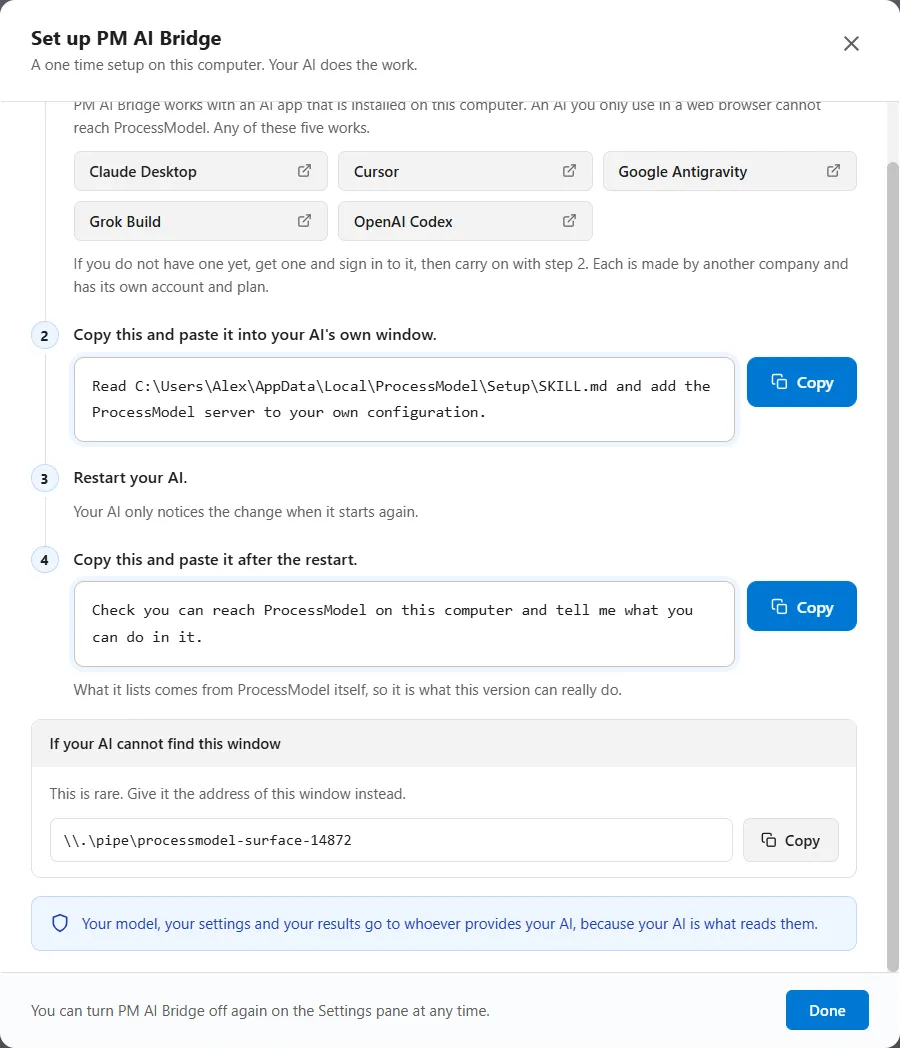
The window ends with “You can turn PM AI Bridge off again on the Settings pane at any time.” and a Done button. The X closes it too.
While your AI works
Section titled “While your AI works”You ask your AI for what you want in its own window. ProcessModel shows you what it does, and the model stays yours.
The title bar
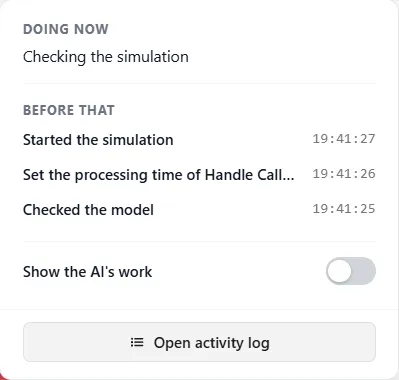
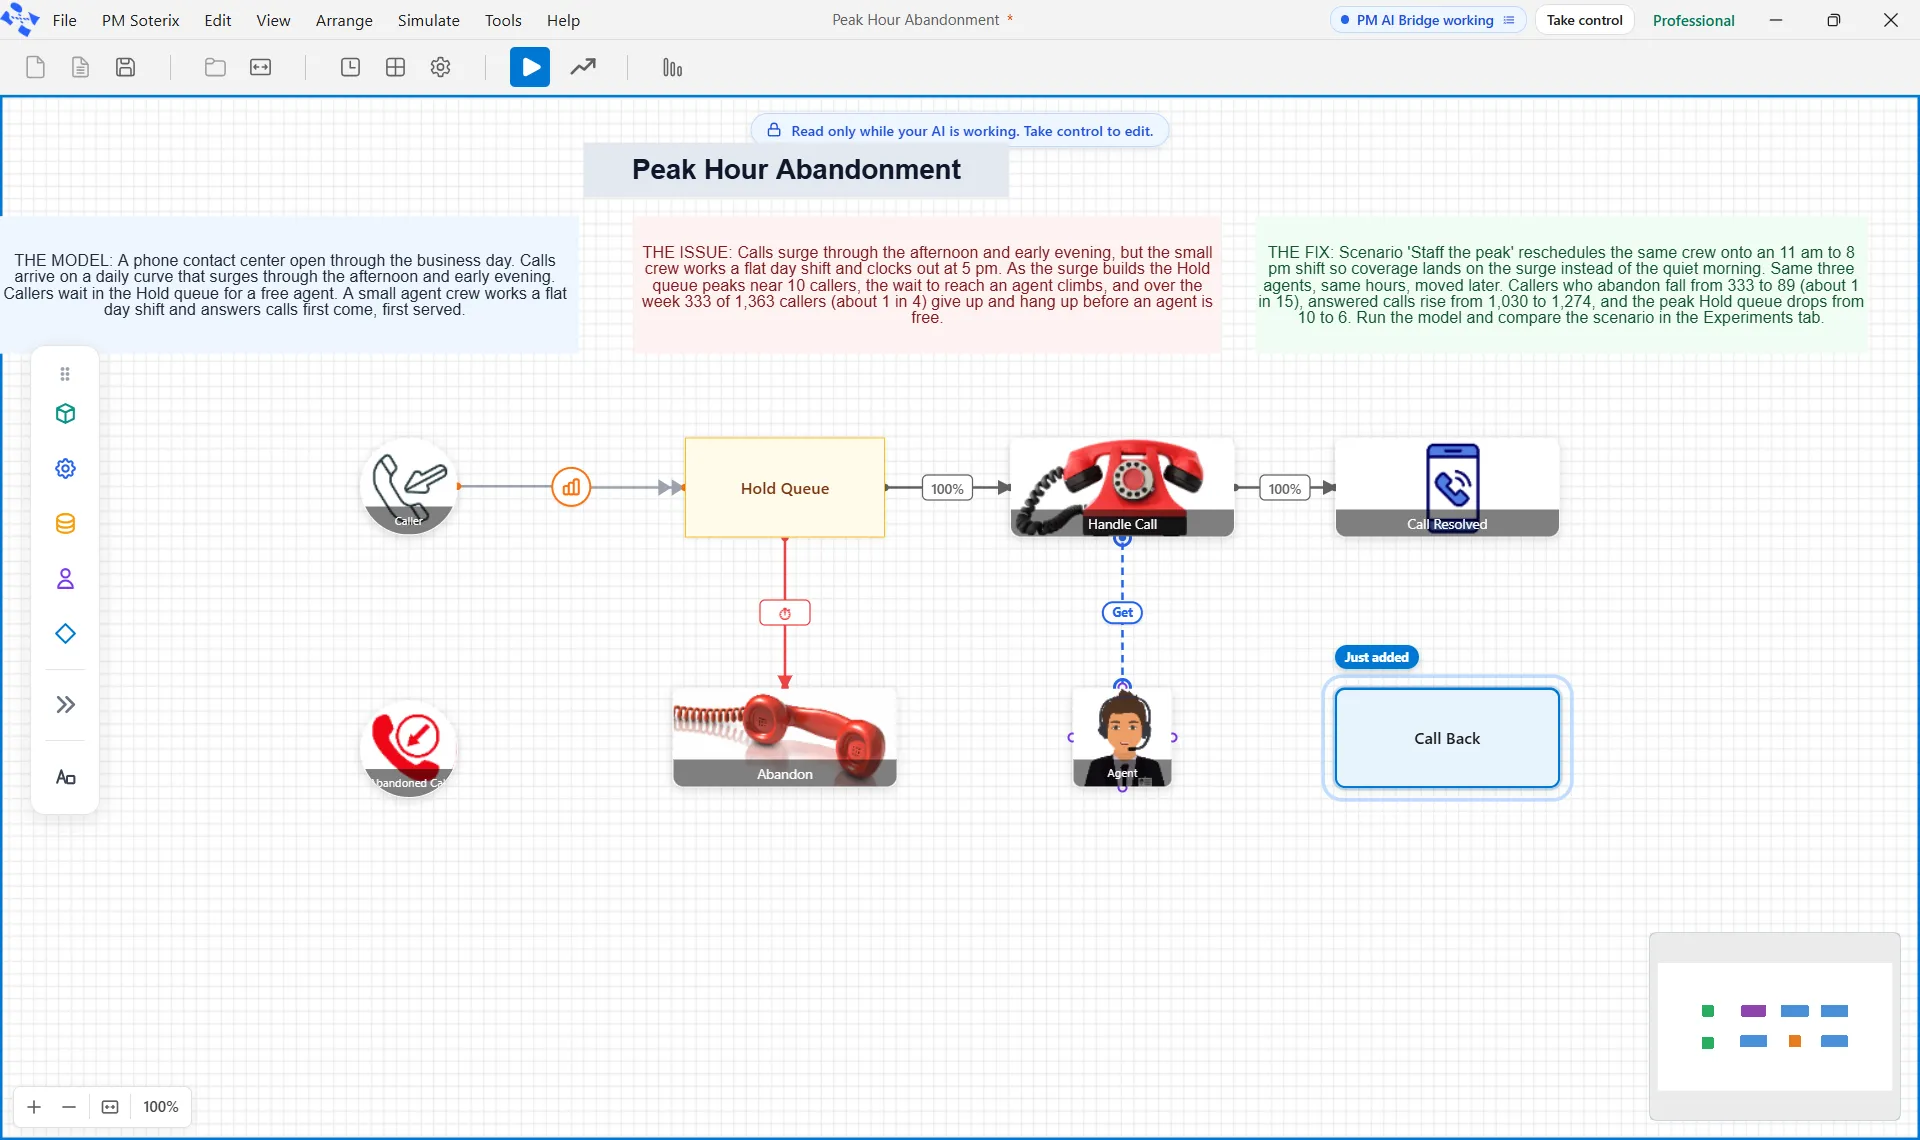
Section titled “The title bar”While your AI is working on a model, a label in the title bar reads PM AI Bridge working, with a Take control button beside it. Rest the pointer on the label to see what your AI is doing now, in one plain sentence. Click it to open a panel with Doing now (or “Nothing right now”), Before that with the last three things your AI did and their times, the Show the AI’s work switch and Open activity log.

Take control
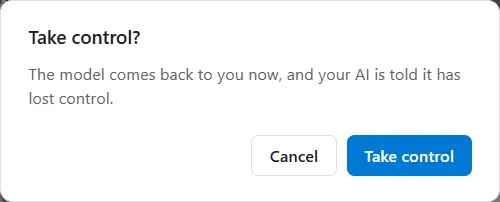
Section titled “Take control”Take control hands the model back at once. It asks first: “The model comes back to you now, and your AI is told it has lost control.” Choose Take control to go ahead, or Cancel. When you take control:
- the canvas is yours again at once;
- a run your AI started stops;
- what your AI already did stays, as one step in Undo;
- your AI’s next request is refused, and it carries on only when you ask it to.
PM AI Bridge stays on.
The canvas
Section titled “The canvas”While your AI is changing the model, the canvas is read only. A blue edge runs around it, and a label at the top reads “Read only while your AI is working. Take control to edit.” The shape your AI just added, moved or changed gets a ring and a tag: “Just added”, “Just moved” or “Just changed”, or a line such as “Just changed: processing time set to 2 min”. The canvas scrolls the shape into view, and ProcessModel never changes what you have selected.
What goes gray
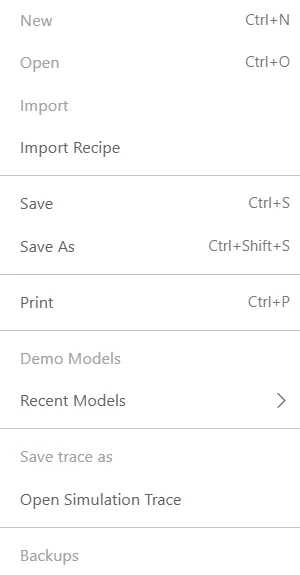
Section titled “What goes gray”While your AI works, some menu items go gray. In the File menu these include New, Open, Import, Demo Models and Backups. In the Edit menu, Undo, Redo, Cut, Paste and Delete go gray, and so do the Arrange commands that move shapes. Save, Save As and Print stay available.
With PM Optimizer open, Duplicate and Delete on an experiment go gray too, and so do Save Experiment and Save & Run Experiment when you have unsaved changes. Save as Scenario is gray with the same note as the canvas: “Read only while your AI is working. Take control to edit.”
Show the AI’s work
Section titled “Show the AI’s work”Show the AI’s work is a switch in Settings and in the panel under the title bar label. It starts off. Settings describes it: “A change that lives behind a dialog is made in that dialog, where you can watch it. It turns each change from an instant into a few seconds.”
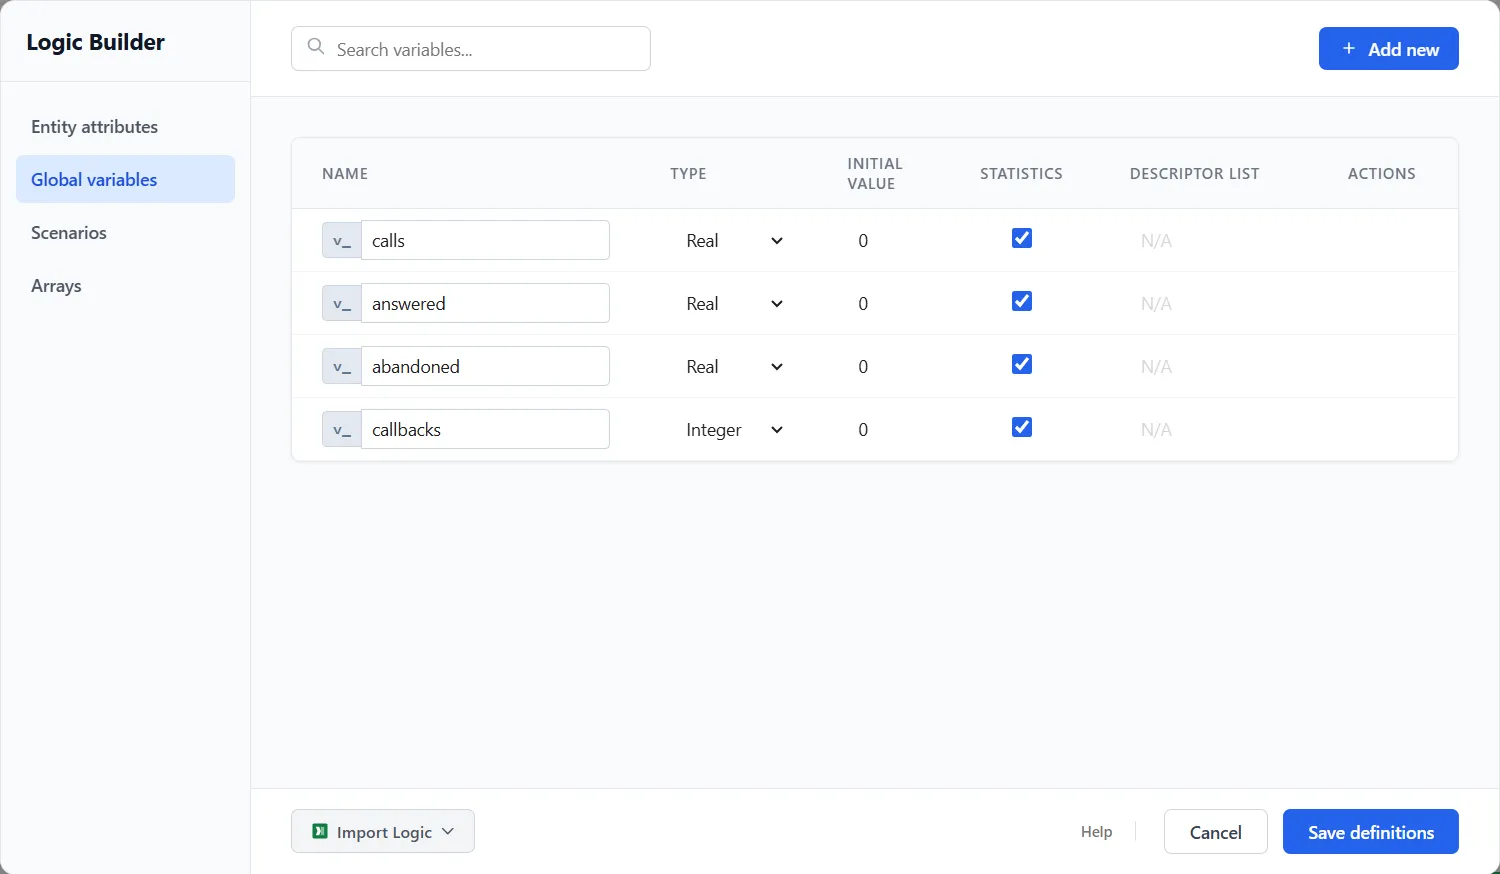
With it on, a change that lives in a dialog, such as the Logic Builder, a scenario’s editor or the Shift Schedule Builder, is made inside that dialog for a couple of seconds while you watch. Clicks do nothing in it, and Esc or Take control ends it. Changes on the canvas and in the Properties panel are not shown this way.
Everything your AI changes on the canvas in one stretch is one step in Undo. One press of Edit ▸ Undo, or Ctrl+Z, takes the whole stretch back. Undo is gray while your AI works. Logic Builder sheets, scenarios, definitions, Simulation Options, report settings and process tables are not taken back by Undo.
The activity log
Section titled “The activity log”Everything your AI asks for goes into the activity log. Open it with Open log under Activity log in Settings, or with Open activity log in the title bar panel. The window is titled “PM AI Bridge activity” and reads “Everything your AI asked for, and what ProcessModel did about it, oldest first.”
It has three columns: Time, What was asked and What happened. Requests sit under a heading that gives the time and the AI that asked. When the changes in a group are one step in Undo, the heading ends “one step in Undo”. A read says how much came back, such as “Returned 7 shapes, 5 routes and 1 resource.” A change says what happened, such as “Set.” A request that ProcessModel refused is red, and reads “Refused.” followed by ProcessModel’s own sentence.
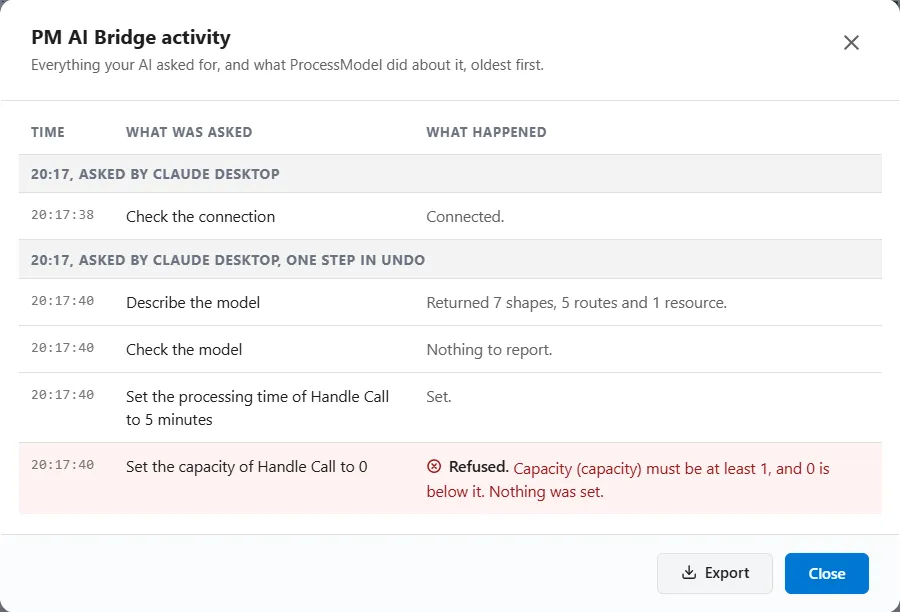
Export saves the log as a text file named “AI activity log.txt”. Close closes the window. The log keeps the last 500 requests of the window you are working in, and starts empty each time ProcessModel starts. Until your AI asks for something it says “Nothing has been asked for yet.” and Export is gray.

What your AI can and cannot do
Section titled “What your AI can and cannot do”Your AI can do what a person can do in ProcessModel. Through PM AI Bridge it can:
- read your model and check it for problems;
- change anything in it that you can change;
- start, open, close and save models, as the File menu does;
- run the model as the Simulate button does, follow the run and read the results from the Output Report;
- open PM Optimizer and run or screen a study in it;
- read the Emergency Department report, start a typical Emergency Department from your visits a year, and open the Demo Models.
It cannot create an account or change your license, edit files outside ProcessModel, or press Undo or Redo. Protecting a model needs your own password and your confirmation.
ProcessModel refuses your AI where it would refuse you, and where a request would lose work you have not saved. Every refusal carries ProcessModel’s own sentence, so your AI can tell you why and ask for something else. The activity log shows a refusal in red, “Refused.” and the reason, as in Figure 15.
If your AI cannot reach ProcessModel
Section titled “If your AI cannot reach ProcessModel”Check these in order:
- PM AI Bridge is on. The switch in Settings is on, and a ProcessModel window is open.
- Your license is above Personal. On the Personal license PM AI Bridge is off, and Settings says “PM AI Bridge is part of Professional. Upgrade to work on your models with your own AI app.”
- Your AI is an app on this computer. An AI you only use in a web browser cannot reach ProcessModel.
- You pasted the first line. It is step 2 of the Set up window, pasted into your AI’s own window.
- You restarted your AI. “Your AI only notices the change when it starts again.”
- Give it the address. If your AI still cannot find ProcessModel, copy the address under “If your AI cannot find this window” in the Set up window and give it to your AI.
When your AI has reached ProcessModel, the card in Settings says so and names it, for example “Claude Desktop is connected”. The name is the one your AI app gives itself.
If it still does not connect, get in touch.