
Routing settings
Routing settings control how the connecting lines are drawn on the canvas. They change nothing about how entities flow.
This is worth being clear about, because “routing” means two different things in ProcessModel. If you are looking for percentages, conditions, or any of the route types that decide where an entity goes next, you want Routing instead. This page is about the appearance of the lines: how they bend, how far they sit from your shapes, and how much room they leave each other.
Open the panel from Arrange ▸ Routing settings.
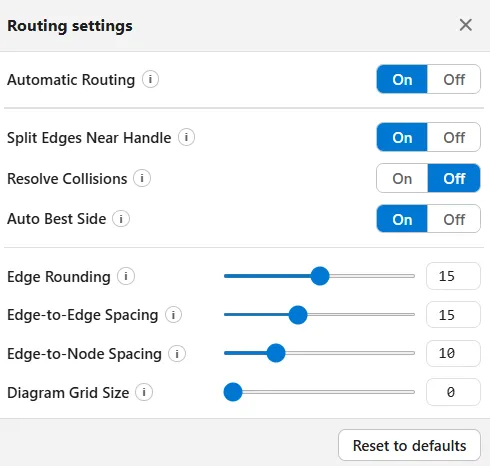
The panel floats over the canvas and does not block it. Drag it by its title bar to move it. Every change takes effect on the canvas immediately, so the way to use it is to move a slider and watch what happens. Escape closes it, and closing it changes nothing.
Automatic Routing
Section titled “Automatic Routing”The first row is the master switch, and it is on by default.
On, lines find their own way around the shapes on the canvas as right-angle paths, and they re-route the moment you drag a shape.
Off, every line becomes a direct path that you shape by hand, and every other control on the panel is greyed out because none of them applies any more.
The three toggles
Section titled “The three toggles”- Split Edges Near Handle separates lines near the point where they meet a shape, so several lines arriving on the same side leave it cleanly instead of stacking on top of each other. On by default.
- Resolve Collisions pushes overlapping shapes apart so they no longer sit on top of one another. It is the odd one out: it moves your shapes, it does not change how lines are drawn. Off by default, since a model reshuffling itself the moment you open it is rarely what you want. Turn it on when you have a pile of overlapping shapes to untangle.
- Auto Best Side lets each line pick which side of a shape to leave from and arrive at, so it never has to wrap around its own shape to get where it is going. With it off, ends stay pinned to the side you attached them to. On by default.
The four sliders
Section titled “The four sliders”Each has a slider and a value box, and both do the same thing. The value box is the one to use when you want an exact number.
| Setting | Range | Default | What it changes |
|---|---|---|---|
| Edge Rounding | 0 to 30 | 15 | The corner radius of a routed line. Above 0 rounds every turn; 0 gives square corners. |
| Edge-to-Edge Spacing | 0 to 40 | 15 | The gap kept between lines running parallel to each other. Raise it when parallel lines are hard to tell apart. |
| Edge-to-Node Spacing | 0 to 40 | 10 | The clearance kept between a line and any shape it passes. Low values run lines almost flush against your shapes. |
| Diagram Grid Size | 0 to 50 | 0 | A snap grid the lines round their turns to. 0 means no grid, which is the default; a value above 0 lines up the bends across the whole model. |
Reset to defaults
Section titled “Reset to defaults”Reset to defaults, at the foot of the panel, puts every control back to the values in the table above and turns Automatic Routing back on. It affects the panel only, so nothing else about your model changes.
These settings are saved with the model
Section titled “These settings are saved with the model”Your routing settings travel with the model file, so a model reopens looking the way you left it, on any computer. Resolve Collisions is the one exception: because it moves shapes rather than lines, it always starts off, so opening a model never rearranges it behind your back.
Related
Section titled “Related”- Routing covers route types and how entities actually flow.
- Auto-Layout rearranges the whole model in one step.