

SLA
A service level agreement (SLA) sets a target time for a process, such as answering a call within two minutes or shipping an order within a day. In version 7 you can measure whether entities meet an SLA by comparing an entity’s time in the system against the target in action logic (see Entity Properties). The step-by-step calculations below are kept for reference.
LegacyHow this worked in the previous version
An insurance company just received tentative approval from another large company to provide long-term disability insurance. Now lawyers from both sides get together to duke out the details. One detail specifies the level of service required by the insurance company. A definable metric might include how quickly the call handlers will answer the phone and how quickly they will resolve the request. These metrics and others are known as the Service Level Agreement (SLA).
You can use action logic to program SLAs, but it is not easy and becomes overwhelming if SLAs count only work hours or there are multiple SLAs in the same model. Fortunately, a new capability makes calculating and reporting SLAs simple.
How to set up an SLA
Section titled “How to set up an SLA”Well, we said it was easy, so we’d better be able to prove it. So this is how the SLA feature works.
Case 1
Section titled “Case 1”Scenario: SLA for Different Priorities using 24-hour per day, 7-day week clock
A customer negotiated for different SLA response times for three priority types:
PriorityProblem DescriptionTime must be better than**% that Must meet the required time**1The problem causes a work stoppage 15 Min95%2The problem causes a work inconvenience120 Min90%3Inquiry only480 Min80%
Define Attributes and Variables
Section titled “Define Attributes and Variables”Create attributes and variables to collect information. First, create “attributes” that delineate the entities. In this case, we use a_Priority to define the different categories of problems. Then create a variable used to record the value of the attribute for each Entity exiting the model. The variable records the attribute’s value for each Entity leaving the model. In this case, the variable v_Priority records the attribute values of a_Priority. Next, use a variable to record the desired time value at each entity exit. In this case, we use v_Response_Time to record each Entity’s total time in the model.
- Attribute: a_ Priority Type: Integer
- Variables: v_Priority Type: Integer - v_Response_Time Type: Real
Set the Priority Value for Every Entity
Section titled “Set the Priority Value for Every Entity”In this example, we set the Entity’s priority, but in other systems, the delineators might be the type of customer, acuity, or many different elements. Set the “priority” for every Entity. If importing the entities, then set the value before import. If the model sets the priority value according to probability, then ensure the setting of the Priority attribute before the Entity reaches the data collection.
Collect Data - Enter Action Logic on Each Exit
Section titled “Collect Data - Enter Action Logic on Each Exit”On every Exit route, write the following action logic:
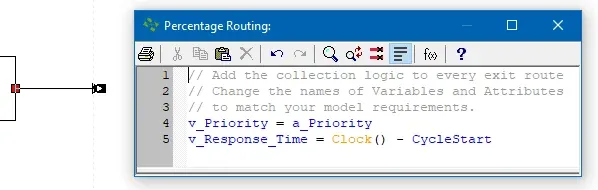
The example logic above uses names for attributes and variables defined by our model. Use attribute and variable names that match your purpose.
Writing variables simultaneously lets the system know these variables are related to allow reporting of SLA stats. For example, complex groupings might require more than two variables to delineate subgroups. The principle is the same for complex systems - simultaneously write all the needed variables. For example, in a call center servicing several companies, you may want to add another delineator called v_Company (a numeric value for the customer name). This additional attribute allows separation by priority and Company.
How to Access the SLA Statistic
Section titled “How to Access the SLA Statistic”The following screenshots provide the procedure to show all service level agreement statistics in the Output Report program.
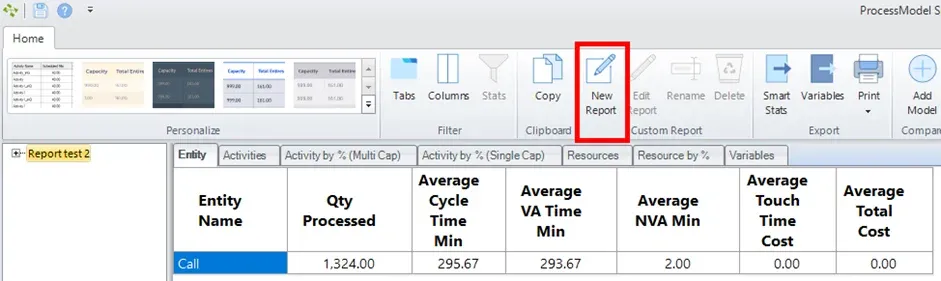
Click on the New Report button, and a blank output sheet will appear.
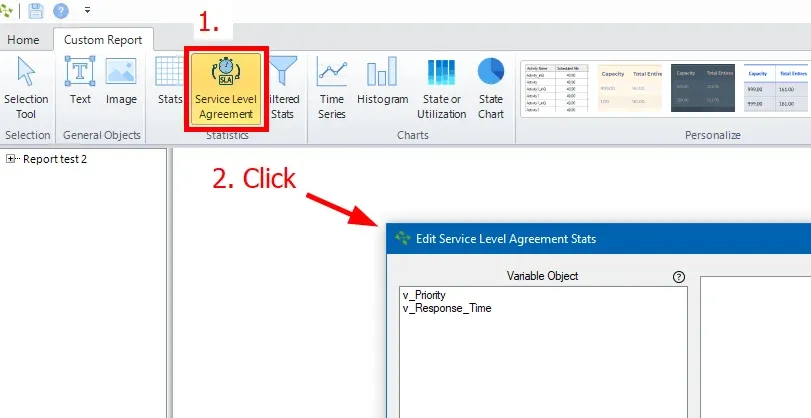
Click on the Service Level Agreement button. Then, click on the layout where you want the upper-left corner of the statistic to appear.
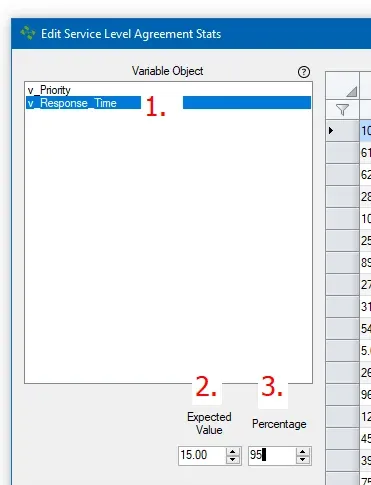
First, select the SLA time statistic. Second, enter the SLA test value. For example, the expected response time is 15 minutes. Third, enter the percentage required to be lower than the expected response time.
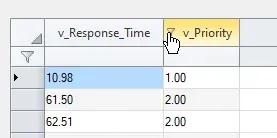
Next, hover the mouse over the left side of the header and click on the filter icon.
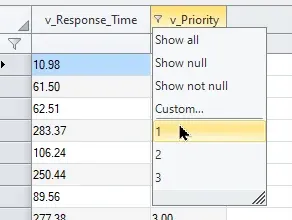
Select “one” to show only priority one statistics.
The data above provides the basis for priority 1 SLA statistics. See the display results below:
Achieving the service level turns the cell green while failing the service level turns the cell red.
The new report displayed below shows the SLA for all three priorities:
Case 2
Section titled “Case 2”Scenario: SLA for Different Priorities using only work time — 5 days a week, 8 hours per day
The main concepts remain constant, but you must use a clock that only advances when the required shift is active. In the previous example, when a call enters the system, the attribute CycleStart is set to the simulation clock. At the end of the simulation, the beginning time is subtracted from the current time to provide a response time.
In this example, a small Model Object provides the clock that stops moving when off-shift. The name of the model object is SLA Clock. Insert the model object and make the following changes to your model.
-
Create a shift for the SLA Clock Activity. Create the shift to match your requirements. See the example shift below for five days a week, from eight AM to five PM.
-
Browse to find the newly created shift.
-
Adjust the SLA Clock’s resolution by opening the activity’s action logic. The resolution determines how often the logic cycles. For example, the resolution shown in the clock above means that the clock will cycle in 1-minute increments.
-
When an entity enters the simulation, set the value of the attribute a_SLA_CycleStart to the SLA clock variable v_SLA_Clock_Time1.
-
On every entity exit, modify the collection logic to use the SLA Clock variable and SLA cycle start attribute used at entity entrance into the model.
Display the SLA statistic for modified work weeks using the same techniques the previous SLA example used.
Benefits to You
Section titled “Benefits to You”With only a few variables and attributes, many separate SLAs become available. Therefore, there is no need to define independent variables for each group. In addition to requiring fewer variables, this method of setting up and modifying SLA information is faster and easier.
Calculate SLA in minutes
Section titled “Calculate SLA in minutes”When you need to calculate SLA even if the entities are still in the model, and to report entities achieving SLA time. The calculations of SLA includes, all entities that have entered the system, any entity that has exited the system that has exceeded the SLA time, and any entity that is in the system that have exceeded the SLA time.
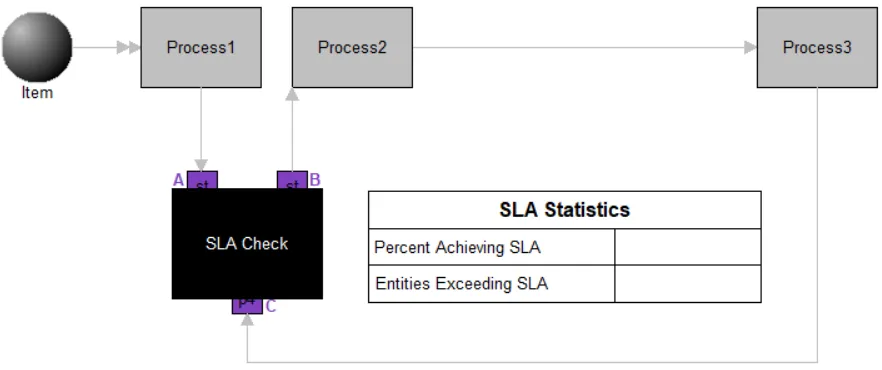
Where to Find the Model Object
Section titled “Where to Find the Model Object”The following model object can be found in the model objects directory:
- Reporting - Calculate SLA in Minutes
Difficulty Level
Section titled “Difficulty Level”- Ease of Use: Moderate
- Ease of Modification: Moderate
How to Use the Model Object
Section titled “How to Use the Model Object”-
Open Your Model: Open your model or create a new blank model.
-
Insert the Model Object into Your Model
-
Locate the model object Calculate SLA in Minutes and select the insert button.
-
Move the cursor to the point of insertion and left mouse-click. The upper left corner of the model object will be inserted at the location of the mouse-click.
-
Connect to Your Model
-
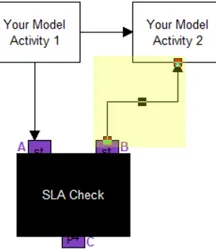
**Connect **from the first activity of your model to purple point ‘A’.
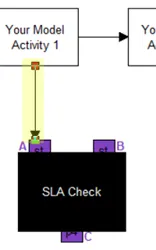
- **Connect **from purple point ‘B’ to the second activity of your model.
-
**Delete **the **routing **between the first, and the second activity of your model.
-
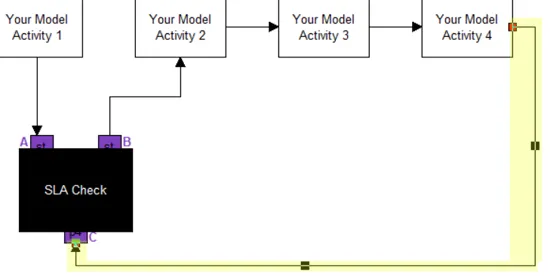
**Connect **any **exits **from your **model **to purple point ‘C’.
-
Define Values: **Define **the values for scenario parameters **s_SLATimeInMin1 **and **s_AccuracyTime1 **based on the information provided under the heading Scenario Parameters below. The values for these Scenario Parameters must be provided before the simulation start.
-
Completion: The model object is now integrated into your model, you should now be able to save and then simulate the model.
Controls Usage
Section titled “Controls Usage”Attributes:
Section titled “Attributes:”- a_StartTime1: Do not change. Is used to calculate start time for the entity.
- a_EntTotalTime1: Do not change. Is used to calculate total time for the entity has spent in the model.
- a_AlreadyMarked1: Do not change. Is used to know if the entity is already marked for exceeding SLA.
Variables:
Section titled “Variables:”- v_TotalExceedingSLA1: Do not change. Is used to calculate entities exceeding SLA time.
- v_PercentAchievingSLA1: Do not change. Is used to calculate the percentage of entities that achieved SLA time.
- v_EntityCount1: Do not change. Is used to calculate the number of entities that arrived in the model.
- v_StartTime1: Do not change. Is used to transfer start time information from created entity to the main entity.
- v_AlreadyMarked1: Do not change. Is used to transfer ‘already marked’ information from created entity to the main entity.
Scenario Parameters:
Section titled “Scenario Parameters:”- s_SLATimeInMin1: User input required. Define the SLA time, in minutes, of your scenario.
- s_AccuracyTime1: User input required. Is used to set the accuracy of SLA, in minutes. A larger number will be used for longer SLA times, which will make the model run faster. A smaller number will be used for shorter SLA times, which will make the model slower. Example: In a call center environment, where the SLA times are usually in minutes, the accuracy required can be a smaller number. In a real estate business the SLA time can be in days, the accuracy required can be a larger number.
Calculate SLA in hours
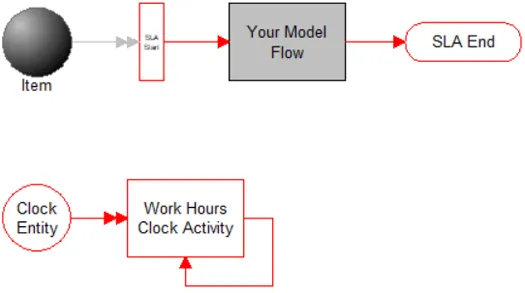
Section titled “Calculate SLA in hours”When you need to to calculate SLA even if the entities are still in the model and to report entities achieving or not achieving SLA time. For example, in one company, time used in the calculation of the SLA is accumulated during the hours between 8AM and 5PM, on Monday thru Friday. Time accumulating after 5PM or on weekends will not be counted in the calculation of the SLA. The user adjusts what time is counted for SLA calculations by adjusting the shift assigned to the Work Hours Clock activity.
Where to Find the Model Object
Section titled “Where to Find the Model Object”The following model object can be found in the model objects directory:
- Reporting - Calculate SLA in Hours
Difficulty Level
Section titled “Difficulty Level”- Ease of Use: Moderate
- Ease of Modification: Moderate
How to Use the Model Object
Section titled “How to Use the Model Object”-
Open Your Model: Open your model or create a new blank model.
-
Insert the Model Object into Your Model
-
Locate the model object Calculate SLA in Hours and select the insert button.
-
Move the cursor to the point of insertion and left mouse-click. The upper left corner of the model object will be inserted at the location of the mouse-click.
-
Connect to Your Model
-
**Connect **entity arrivals from your model to SLA Start.
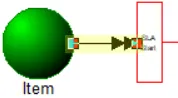
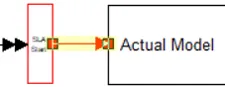
- **Disconnect **the red percentage route **arriving **to Your Model Flow and connect it to **your actual model **where entities need to arrive.
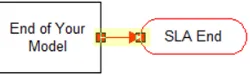
- **Disconnect **the red percentage route **exiting **from Your Model Flow and connect it to the end of your model.
- Remove the activity Your Model Flow.
- Update Shifts
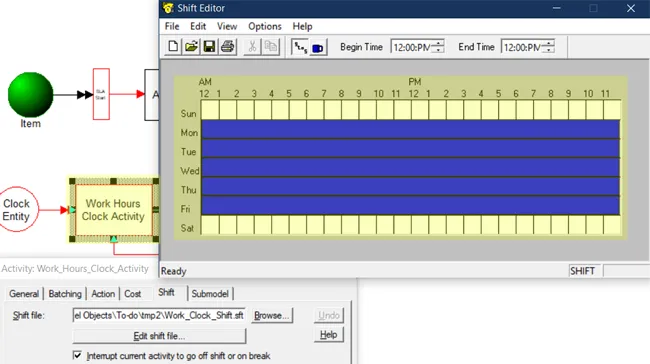
**Edit **the shift file connected to Work Hours Clock Activity to match your scenario’s shift.
- Do not use a 24/7 shift. If your scenario requires the SLA to be calculated 24/7, simply remove the shift file.
-
Define Values
-
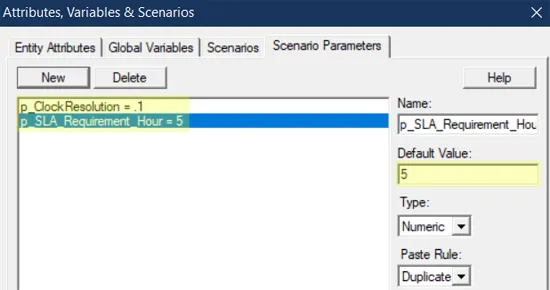
**Define **the values for scenario parameters p_ClockResolution, and **p_SLA_Requirement_Hour **based on the information provided under the heading Scenario Parameters below. The values for these Scenario Parameters must be provided to each entity before the simulation start.
- Completion: The model object is now integrated into your model, you should now be able to save and then simulate the model.
Controls Usage
Section titled “Controls Usage”Attributes:
Section titled “Attributes:”- a_SLA_CycleStart: Do not change. Is used to calculate start time for the entity.
Variables:
Section titled “Variables:”- v_SLA_Clock_Hour: Do not change. Is used to calculate the SLA clock time.
- v_SLA_EntityCnt: Do not change. Is used to count the entities that have exited the simulation and for whom SLA has been calculated.
- v_SLA_Failure_Cnt: Do not change. Is used to count the entities that have exited the simulation and have failed SLA.
- v_SLA_Pass_Cnt: Do not change. Is used to count the entities that have exited the simulation and have passed SLA.
- v_SLA_Per_Achieving: Do not change. Is used to count the percentage of of total entities that achieved SLA.
- v_Time: Do not change. Is used to calculate average SLA time.
Scenario Parameters:
Section titled “Scenario Parameters:”- p_ClockResolution: User input required. Is used to define the clock resolution time in decimal hours. Default is is to .1 decimal hours.
- p_SLA_Requirement_Hour: User input required. Is used to define SLA time in hours.